12th January marked my first Science lesson in Hwa Chong- a milestone indeed!
Ok, maybe the first Science lesson wasn't that grand- more like a briefing and introduction to Science. We were taken to the Science Lab by Mr Ong, who was substituting our LSS teacher (who was away at reservice). The Science Laboratory was a fascinating place, with all sorts of interesting equipment, but Mr Ong warned us to take the necessary procedures to ensure our safety within the lab. Without adhering to the following rules, one could potentially be endangering one's life! :O
Laboratory Safety Rules
1) Read all directions for an experiment and follow the directions exactly as they are written. If in doubt, ask the teacher.
2) Never perform experiments that are not authorized by your teacher. Always obtain permission before experimenting on your own.
3) Never handle any equipment unless you have specific permission.
4) Take care not to spill any materials in the lab. If a spill occurs, ask your teacher immediately about the proper clean up procedure.
5) Dispose of all material according to the teacher's instructions. Never empty materials into the sink or trash can.
6) Never eat in the laboratory. Wash your hands before and after each experiment.
7) Never horse play or run in the laboratory.
8) Know the location and function of all laboratory safety equipment
Simply by following the above guidelines, you can reduce the chances of yourself being harmed in the Science Lab by a significant amount. Remember, it is better to be safe than sorry!
The Science Lab is also full of toxic chemicals which can be hazardous to one's health. Learning how to identify hazard symbols is very important to prevent accidents. Mr Ong showed us a list of hazard symbols and what they represented:
Hazard symbols

Last but not least, we made a few sketches of laboratory apparatus, such as retort stands, beakers and filter funnels. We also had to identify equipment based on a diagram.
All in all, I found the first Science lesson very informative and enjoyable, and I look forward to the next one :)
-----------------------------------------------------------------------------------------------------
Bunsen burner
In the days following our first Science lesson, Mr Ong introduced us to a piece of equipment that we would use frequently later on: The Bunsen burner! It was my first time seeing one, though I had seen diagrams of it before. Here's a picture of a typical lit-up Bunsen burner:

Barrel: To raise the flame to a suitable height for burning
Collar (Where the air vent is): Can be turned to adjust intake of air from the air-holes
Jet: To enable the gas to rush out of the gas supply and to draw in air
Air holes: To allow the air to enter the burner
Gas tap: To control the flow of gas to the Bunsen burner
Base: Acts as a support for the Bunsen burner and prevents it from toppling
Of course, a Bunsen burner can be very dangerous if handled incorrectly. So, here are a few things to watch out for:
Precautions
Check that the rubber tubing is properly connected to the gas tap
Ensure that the air hole is closed before lighting the burner
Make sure the gas tap is closed when the Bunsen burner is not in use (the gas is poisonous!)
Strike backs occur when the air hole is fully open, resulting in the gas burning at the jet due to excess air. The flame will turn green and a loud noise can be heard.
Close the gas tap IMMEDIATELY when a strike back occurs.
Take care not to touch the collar as it may be VERY hot.
Allow the collar to cool down before using the burner again.
We also learnt to differentiate between luminous and non-luminous flames and their uses. Here is a comparison between the two:
Luminous flame
- Orange/yellow in colour
- Unsteady flame
- Visible at a distance
- Flame is not hot
Non-luminous flame
- Blue in colour
- Steady flame
- Not visible at a distance
- Flame is hot
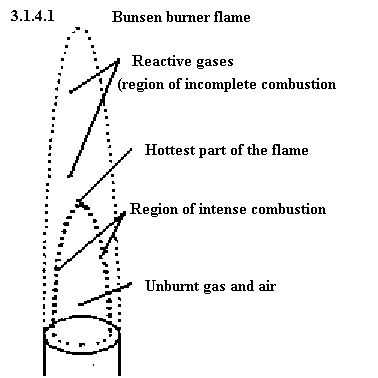
Here's a diagram of a (non-luminous) flame:
We also had the opportunity to experiment with the Bunsen burner by heating water to its boiling point.
This lesson did not disappoint me and I walked out of the Science Laboratory much more knowledgeable about Bunsen burners than when I had walked in. Not only did I learn about the parts comprising a Bunsen burner, I also learnt how to operate it and found out the differences between luminous and non-luminous flames. Most importantly, I learnt that the instruments in the Science Lab, though intriguing, are often dangerous if one does not know the appropriate safety procedures. In a nutshell, we must be responsible and act sensibly in the Lab.
Can't wait for the next lesson! Hope it will be just as entertaining as this one :-)
-----------------------------------------------------------------------------------------------------
Scientific skills
This Science lesson was also conducted by Mr. Ong, and I trotted off to the lab with my classmates looking forward to it.
For this lesson, we would be practising the scientific skills of observing and recording, which are essential in Science. Recording helps to organise the information we have gathered from our observations.
Firstly, after donning our safety goggles, we added vinegar into a test tube until the liquid level was approximately 1cm. We then placed a spatula of sodium bicarbonate into the test tube. The result: The sodium bicarbonate dissolved to form a colourless solution and effervescence of a colourless, odourless gas was seen. Here's a handy illustration:

Afterwards, we quarter-filled up two clean test tubes with water, proceeding to add a spatula of sodium carbonate to one test tube. We shook the tube until the sodium carbonate dissolved, forming a colourless solution. Following that, we added a dry spatula full of copper sulfate to the other test tube and shook it until the crystals dissolved and formed a blue solution. Finally, we poured the contents of one test tube into the other, causing a blue precipitate to be formed. The result looked something like this:

We also conducted other experiments such as placing a drop of methylated spirits on the back of our hands and blowing air over it (generating a cooling sensation), blowing out into limewater (white precipitate formed) and adding iodine solution into a test tube containing starch suspension (blue black colouration seen).
We were also educated about the dissimilarities between an observation and influence. Here is a short comparison between the two:
Observation
- Something that one sees, touches, hears, smells or tastes
Inference
- Something one might decide about a thing or event after observation
Many people often confuse the two, so to make it simpler, let me give an example.
On Planet X, there is an organism called Y. A group of astronauts watched it for a period of time and recorded down some points about it.
Point 1: The organism is perspiring.
This point is an observation because the astronauts saw the organism sweating.
Point 2: The temperature on the planet is high because the organism is sweating.
This point is an inference because the astronauts inferred that the planet is hot after observing that the organism was sweating.
All in all, I found this Science lesson a very satisfying one. Not only did I have some fun, some light was also shed on several issues I had been previously unclear about. Wish the next lesson will not disappoint!
-----------------------------------------------------------------------------------------------------
Observing and recording part 2
This practical turned out to be a rather mundane experience. No new apparatus was introduced to us, the only equipment we used being a thermometer and a Bunsen burner.
The experiment we had to conduct involved heating a 250ml beaker of water and recording its temperature during every interval of a minute. Following which, we illustrated the results in a line graph. This might sound simple, but unfortunately I did very badly for this practical. I got the ENTIRE table of recordings wrong because I wrote the units for each result, whereas in actuality the units had already been given (Temperature/degrees Celsius). My graph was also very badly done as I had made unnecessary markings. It resembled this:


Though this lesson was one of the less interesting ones, I learnt a valuable lesson from it: Do not forget the 'ordinary' scientific skills. If one neglects the fundamental knowledge one should know for conducting Science experiments and recording the observations, how can one progress onward to more challenging and difficult areas of Science? After this lesson, I was determined to clear up any misconceptions I had about graph-drawing and recordings to prevent any careless loss of marks during future tests.